
Hello everybirdie. So today we are going to be making one of my all-time favorite pies. I can only make this pie in the late spring, or earlier summer. But Oh my gosh. Is it SO good! Today we are going to be following Preppy Kitchen’s Strawberry Rhubarb Pie. And also my go-to pie crust recipe from Betty Crocker.

So first before even preheating the oven, we are going to make the pie crust. And um… speaking from experience. Even if you have done this recipe thousands of times, there are going to be times when it just doesn’t turn out well. Well, let me rephrase that. Just like anything else, you have to be careful about the humidity and the weather. Because it can change the consistency of your dessert. Like if you don’t put enough water into the pie crust, you will be fighting a crumby (but tasty) pie crust.

If you prefer store-bought pie crust then feel free to skip this part.
Both recipes will be down below. With the instructions and the measurements. In order to make the pie crust, you are going to need a large mixing bowl. The ingredients you will need:
- Flour
- Salt
- Shortening
- And ICE COLD water

You are going to mix together your flour and salt.
Using a pastry blender or two forks you are going to cut in the shortening until you see a consistency that matches that of small peas.
Sprinkle the dough with your ice-cold water. 1 tablespoon at a time. Toss it with a fork until all of the flour is moistened. If it is a warm or humid day in your kitchen, you may need a little bit more water than is recommended. So my suggestion to you is to wait for a “normal” weather day and follow the recipe. After a few times making this recipe, you will know the feeling of how the pie crust should be.

Gather the pastry into a ball. Divide it in half and shape it into 2 rounds on lightly floured surfaces. Wrap flatted rounds in plastic wrap and the refrigerator says to put it in the fridge for 45 minutes. However, what my mom and I do is put it in the freezer for about 15 minutes or until we are done making the pie mixture.
Now onto the pie filling. The link to the recipe will also be down below. Fill free to check it out.

You will need:
- Strawberries
- Rhubarb
- Sugar
- Cornstarch
- Butter
- Salt
- Vanilla
- Egg yolk (i use the ice cold water from the pie crust and it works perfectly fine)
- (optional) coarse sugar for sprinkling on top
Once you get all of your ingredients together, you are going to preheat your oven to 400℉.

This is the step that ALWAYS takes the longest for me. Processing fruits and veggies take so much longer for me. But we are going to wash and cut the strawberries. And then we are going to cut the rhubarb into pieces less than ½ inch. Place both of them into a large bowl.
Add the sugar, cornstarch, and salt to your fruit. Then mix them to combine, and set it aside.
While the pie filling is set. We are going to try and work with the pie crust. And hopefully not cry.

I went into this pie knowing that I was making two pies. ahhh! That is where I messed up. I forgot that I was doubling the recipe. Meaning that I needed to add about 12-16 tablespoons of the water. I was only following the recipe and put in 7-8 tablespoons. Needless to say, it was a PAIN to try and work with.
Even with saying this, pies are so much fun. And baking is a learning curve. No person is going to make things perfect every time. Even the best baker’s out there have times when they fail. Failing (while not getting hurt) is needed in order to be a better person.
Sorry, back to the pie crust. You are going to roll your pie crust out and put it into your pie tin. And make sure that you keep your surface and pie crust floured because it is really sad when you think you have the perfect crust and go to roll it up on your rolling pin, and it is not moving.

Once you placed your bottom crust you are going to evenly distribute your pie filling.
The top part is where a pie maker can be creative. You can do it in many different ways.
- Put it on top and put small slits in it.
- Try your hand at a pretty lattice.
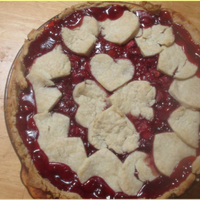
- Or you can grab yourself a cookie cutter and make a sort of design with it.
- Have fun and create your own design.

I was so devastated when I was working on my pie crust. I was frustrated and kept looking at the time. Time is sometimes my worst enemy. I will go into the kitchen at about 2 or 3 pm and not come out until 6 or 7 pm.
But I think it turned out really well. And we had this pie two days in a row and it was really interesting to see how it set when it cooled.
I hope that you like this recipe. Feel free to check out the description down below. See you in the next recipe. Thank you.
Show the original author some 💖💖💖 Preppy Kitchen
Show the original pie crust, author, some 💖💖💖 Betty Crocker
Here is a printable version of this recipe: on the blog
Printable version of this pie crust recipe: on the blog
Please help me get a phone: by supporting me on Kofi / Patreon
Leave a Reply