
Sul Sul, gerbits. Today we are going to be making something that I have never made before. A grape pie.

I have heard about them, and apparently, they were invented in the Finger Lakes region of New York. So, when we had a bunch of grapes in the fridge I challenged myself to make a grape pie.

I learned from the various pies I had done in the past, that I needed to start earlier rather than later. And so I am starting my pie at 11:30 in the morning.

The first thing that we need to do is create the pie crust. The reason why you want to start the pie crust first is that the longer it is in the freezer, the flakier it is. Or you can buy a ready-made pie crust, whatever you like.

For this recipe, we are going to be making a normal pie crust. To do this add the flour and salt in a mixing bowl. Cut in your shortening with a pastry blender or a fork. Add your ice water 1 tablespoon at a time. Gather your dough into a ball, on a lightly floured surface you are going to shape your dough into a more refined ball.

For this recipe, you are going to need two pie crusts. So to do that you are going to equally cut your dough in half. Wrapping both crusts individually with plastic wrap and place them in the freezer until you need them.

For the pie, the first thing that we are going to do is process the seeded grapes.

To that, you are going to pluck the grapes from the stems, measuring the quantity of desired cups for the recipe. However, in my case, I measured out 6 cups of grapes. However, when processed it reduced down to 3 cups. Make sure to keep that in mind.

Rinse your grapes and wash your hands.
Okay, now we have to start with the long process of de-skinning the grapes. With some of your favorite music on in the background, get comfortable. Have two “bowls” in front of you. One is going to be a saucepan, and the other is going to be a mixing bowl.

You are going to slip the skins from the grapes over the saucepan, these are the guts. It is going to look green and seedy.

Drop the empty skins into the other bowl. This is going to take a while, so feel free to listen to some music or an audiobook. Whatever, like.

Once you have done all the seeds, you are going to start to cook the grape guts, stirring them often, simmering them until the pulp breaks down and the seeds come out.

I used a wire strainer and a spoon. This took a while to do, but I poured the pulp and the grape juice and the seeds into the strainer and removed the seeds. The recipe states that you should use a food mill. At this point, I don’t own a food mill so I used a wire strainer and a spoon. But, I made sure to strain it more than once. Just so nobody chomped down on a grape seed. Ow!

Once you have gotten the seeds out of the guts. You are going to reunite the skins with the pulp and juice. And stir it until combined. This will be a gorgeous shade of purple.

Now the grapes are ready to be in the pie.
You are going to preheat your oven to 400 degrees.
Return the grape pulp and the skins to the saucepan, and bring them to a boil. Then you are going to turn off the heat.

Stir in your sugar, salt, nutmeg or cinnamon, and lemon juice. Make sure to taste your grapes beforehand. If you feel that they are on the sour side, you may want to add a little bit more sugar.

In a small mixing bowl measure out your cornstarch. Ladle a small amount of the grape mixture into this bowl. You are dissolving the corn starch, once it is dissolved completely add the cornstarch mixture to the grape mixture in the saucepan.

Now you are going to roll out both of your pie crusts. Fill with the grape mixture. Again look at the color of this, it is a stunning deep purple that would be hard to duplicate.

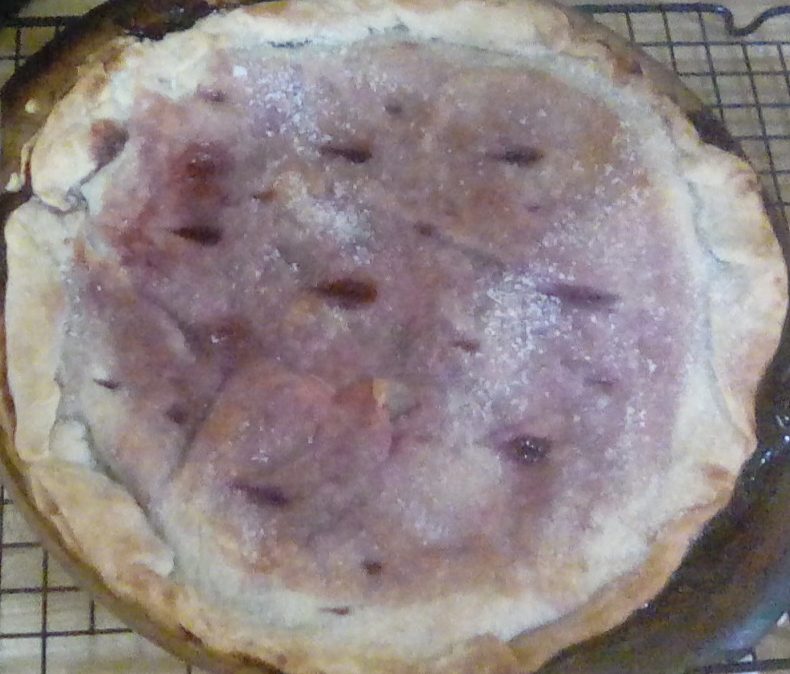
Place your top crust over the grape. Remember to breathe you do this. Because whenever I place a top crust on my pies, I usually hold my breath because I am afraid of damaging the fruit mixture inside. Brush the top of the pie with egg whites and sprinkle a little bit of sugar on top.

Bake the pie for 40 to 50 minutes. Make sure to keep an eye on it, if the pie crust starts to brown too fast, line some aluminum foil over the edges. I did not need to do this because I place the pie on the lowest level of the oven.


Let it cool on the counter for a few minutes, and then place it in the fridge to get the best results.

This was a pie that I have heard of so many times, but I have not ever had it. I was really happy when I was able to make it.

I am glad that I started making this pie earlier because I ended up being done with it at almost 4 pm. Make sure to know your body and know how long you are going to be in the kitchen.

I hope you all like this recipe. Feel free to like and subscribe for more recipes like this in the future. Vadish, Dag Dag!
Show the original author some 💖💖💖 The Opulent Opossum
Show the original pie crust, author, some 💖💖💖 Betty Crocker
Printable version of this recipe: on the blog
Printable version of this pie crust recipe: on the blog
Feel free to support me on: